31 dicembre 2013

"Glitter Houses Village"

Ed eccoci infine al 31 dicembre con il 2013 che sta per lasciare il posto al 2014!
Mi piacerebbe concludere questo anno mostrandovi questo Glitter Houses Village realizzato poco prima del Natale...si tratta di una serie di casette realizzate in cartoncino da legatoria dipinte assemblate e poi coperte interamente di colla e glitter....la versione Shabby Chic di un paesaggio invernale...


Glitter+ Houses +Village

Glitter+ Houses +Village

In America questo tipo di casette è molto popolare e quando ho visto le foto su Pinterest non ho potuto resistere alla tentazione di farne uno....gli alberi li ho acquistati di colore verde poi con l'aiuto di alcuni tutorial scovati su internet li ho decolorati in varechina e ritinti in rosa azzurro e verde muschio utilizzando colori per nylon.....io lo trovo adorabile...viene voglia di mangiarlo sembra fatto di zucchero!!

Glitter+ Houses +Village

I modelli per le casette li ho trovati su internet, ad alcune ho fatto anche gli steccati e il giardino....con l'aggiunta un immancabile pupazzo di neve.
E' stato un lavoro impegnativo ma vederlo montato in casa con tutte le sue belle finestrelle illuminate mi fa pensare che ne sia valsa la pena!
Spero di aver fatto venire voglia a qualcuna di voi di provare a realizzarne uno per il prossimo Natale!

Glitter+ Houses +Village


Vi lascio con qualche altra foto e vi auguro un 
"FELICE E SERENO 2014"
Vale_

Glitter+ Houses +Village

Glitter+ Houses +Village


24 dicembre 2013

Buon Natale....Merry Christmas


Come ogni anno eccomi qui la vigilia di Natale a preparare la cartolina per il Blog...pensando nel frattempo a cosa scrivere...sono così tante le cose che vorrei dire e forse è proprio per questo...
che non riesco a trovare le parole adatte.
Vorrei ringraziare tutte voi per il sostegno che mi date ogni volta che decidete di lasciare un messaggio o condividere un pensiero... oppure quando curiosate un pò tra i post di questo piccolo blog....siete l'anima di questo spazio cibernetico le piccole voci che si uniscono per formare il coro...e io mi sento davvero felice per questo perchè tutto ciò che faccio trova un significato in questo modo...un modo fatto di "click" di parole scritte in momenti rubati alla quotidianità...attimi speciali in cui ognuna di noi prende un respiro...si ritaglia un momento prezioso da dedicare alla propria anima e alle proprie passioni...
Grazie di cuore, vi auguro un Natale pieno di Gioia  Serenità e Creatività!!
Un abbraccio.
Vale_
-------------------------------------

Like every year, here I am on Christmas Eve to prepare the greeting card for the Blog ... and I'm thinking about what to write ... there are so many things I want to say, and maybe that's why ...
I can not find the right words.
I would like to thank all of you for the support you give me every time you decide to leave a message or share a thought ... or when you decide to snoop a bit in the posts of this little blog .... you are the soul of this cyberspace, the small voices that come together to form the choir ... and I feel really happy for this because everything I do find a meaning in this way ... a way made of "clicks" , a way made of words written in moments stolen from the everyday  ... special instants in which each of us take a breath ...and carves out a precious moment to devote to his own soul and passions ...
Thank you, I wish you a Christmas full of Joy Serenity and of course Creativity!
A hug.
Vale_

16 dicembre 2013

DIY.Last minute decorations!

Buon Lunedì, spero abbiate passato un buon weekend e che la nuova settimana sia cominciata nel migliore dei modi!
Per prima cosa vorrei ringraziare tutte coloro che hanno partecipato al giveaway fino ad oggi!
Non ho potuto rispondere ai vostri commenti ma siete state davvero carine e simpatiche! Spero che ancora tante di voi si uniscano!
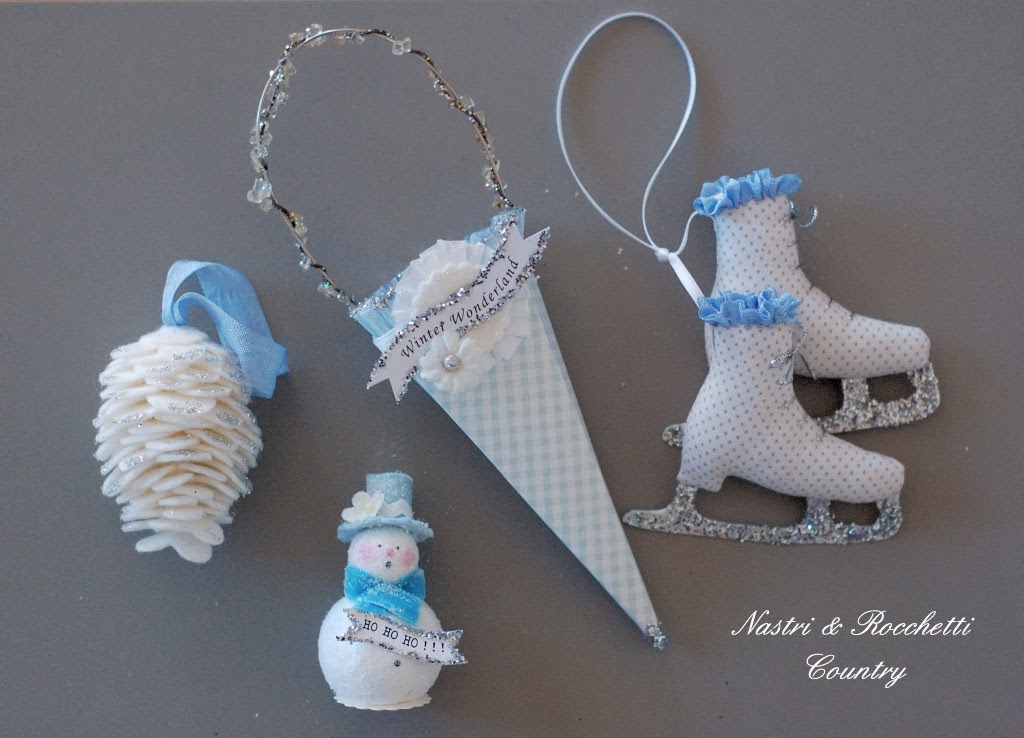
Oggi vorrei presentarvi una serie di quattro decorazioni che io ho definito "Last minute" perchè sono davvero semplici da fare...


L'idea per realizzare queste decorazioni è nata leggendo i vostri commenti su ciò che vi piace fare che mi avete lasciato per il giveaway.... ho notato con piacere che molte di voi seguono questo blog quasi interamente dedicato al cucito anche se amano dedicarsi a tecniche totalmente diverse...così ho creato queste decorazioni ispirandomi a voi e a ciò che amate fare....spero di aver fatto felici le amanti del feltro, del cucito e dello scrapbooking!

Pattini da ghiaccio in tessuto e cartoncino
 I pattini sono realizzati in tessuto di lino bianco, leggermente imbottiti e decorati a piacere...
le lame dei pattini sono in cartoncino di grammatura un pò sostenuta glitterati con glitter argento!

Cono portadoni in cartoncino
 Per realizzare questo cono portadoni sono stati utilizzati: cartoncino da scrapbooking marca Tilda, carta crespa bianca, cartoncino bianco, filo di ferro cotto, passamaneria con mini pom-pom,
glitter argento, glitter fini bianchi.
I PATTERN sono di "A Field Journal" blog e li potete trovare QUI .

Pigna in feltro
Questa pigna è stata realizzata utilizzando: feltro di lana rosa, bastoncino di legno, colla, glitter, perline bianche e rosa.
Il PATTERN e preso dal sito "FamilyCircle" e lo potete trovare QUI.
Dal feltro dovete ricavare :
4 A,  8B, 4C, 4D e una E e montarli nel seguente ordine:
2A/4B/ 4C/4B/2A/4D/E
Ogni strato va forato al centro tutti gli strati vanno poi infilati nel bastoncino di legno avendo cura di inserire un piccolo quadratino di feltro tra uno strato e l'altro per distanziarli!
Fissate il primo e l'ultimo strato con un puntino di colla tagliate il bastoncino in eccesso e il gioco è fatto.
Per fissare il cordino con cui appenderlo ritagliate un cerchietto di feltro fate un buco al centro fatevi passare il cordino e poi fissatelo incollandolo tra la pigna e il cerchietto.

Pupazzo di neve in carta
Questo pupazzo di neve invece è un idea che ho sviluppato io, per realizzarlo ho usato:
due palline di carta compressa di diametro 2cm per la testa e 3,5cm per il corpo, feltro per il cappello, un pezzettino di nastro ric rac per decorare il cappello, un fiorellino di carta, un pezzettino di nastro in velluto per la sciarpa, colla vinilica, glitter, cartoncino bianco.
prendete le due palline e schiacciatele delicatamente una con l'altra per diminuire il dislivello poi incollatele.
Con un taglierino tagliate via una fettina della palla più grande in modo da creare una base che permetta al pupazzo di neve di restare in piedi!
ricavate un cerchio dal cartoncino e incollatelo per fomare la base.
Decorate a piacere poi una volta terminato spalmatelo interamente di colla e copritelo di glitter fini trasparenti (Io uso quelli di Stamperia), così il vostro pupazzetto avrà un aria più "Frozen".
Le scritte augurali, potete utilizzarle anche per i coni di carta e altri progetti, Basterà ritagliarle dando una forma a striscione e glitterando i bordi.

Christmas phrases


Queste decorazioni potranno essere utilizzate per decorare i vostri pacchi o la vostra tavola oppure nel caso del cono per contenere piccoli doni da appendere all'albero!
Ne ho realizzata anche una serie in azzurro.


BUON DIVERTIMENTO!

8 dicembre 2013

Il Giveaway continua.........The giveaway continue.


Ciao a tutte, ormai una settimana è passata e sarebbe arrivata l'ora di fare l'estrazione, ma il tempo a disposizione è stato un pò scarso e mi piacerebbe che più persone avessero la possibilità di partecipare, quindi prolungo il giveaway e farò l'estrazione in occasione della Befana il 6 gennaio!
Dovrete pazientare ancora un pochino!
Vale_
---------------------------------------

Hello to all. Now a week has passed and it's time to do the draw, but the time available was not too much and I would like that more people have the opportunity to participate, so I want to continue the giveaway. I'll do the 'extraction on the occasion of the Epiphany January 6!
You'll have to wait a little bit!
Vale_


2 dicembre 2013

...............................Giveaway!............................

Eccomi finalmente pronta per il mio "Giveaway dei 100 followers!",il giveaway è aperto a tutti anche a chi non ha un blog! Partecipare è semplicissimo:
  •  Dovete lasciare un commento al post, mi piacerebbero poche righe in cui parlate del vostro hobby (cucito,feltro fotografia..etc) qualunque cosa creativa o non che semplicemente vi fa stare bene!
Per chi ha il blog:
  • Dovreste copiare l'HTML  e installare questa icona nel vostro blog per far sapere che partecipate a questo giveaway, così permetterete anche ad altri di partecipare.
Grazie!
-------------------------------------------------------

Here I am, finally ready for my "100 followers Giveaway!" everybody can partecipate even if you don't have a blog! Joining is easy:
  •  You have to leave a comment to this post. I'd love a few words in which you talk about your hobbies (sewing, felt, photography, etc. ..) anything creative or not that simply makes you feel good!
If you have a blog:
  • You have to copy the icon's HTML, and install it in your blog. In that way people know that you participate at this giveaway, and will allow others people to participate.
Thank you!

http://nastrierocchetticountry.blogspot.it/search/label/Giveaway

<a href="http://nastrierocchetticountry.blogspot.it/search/label/Giveaway" target="_blank"><img alt="http://nastrierocchetticountry.blogspot.it/search/label/Giveaway" border="0" height="150" src="https://blogger.googleusercontent.com/img/b/R29vZ2xl/AVvXsEj_X7X868ZPapkjMeecZ1edkbEG-dF-ySmXNCsYq4g6KdHOyOTpCvWErsr1K6RY7oVZJYPysUAXskdL97l_yRkHsjgGKhWB2lsLvn5QgzGZF_B9vcSFQnMhElZtenKnIUhjNoPd5dWm_HE6/s1600/giveaway.gif" width="150" />

Iscriversi non è obbligatorio ma se vi vorrete unire a questo blog ne sarò felice ed onorata!
Lunedì 6 gennaio giorno della Befana ci sarà l'estrazione e il nome del vincitore sarà pubblicato sul sito.
Ora passiamo alle cose importanti...IL PREMIO!
In palio per questo GIVEAWAY ci sarà questo angelo di TILDA dall'ultimo libro VINTERGLEDER, in colore azzurro!
Spero di vedere tanti partecipanti ed auguro a tutti buona fortuna!

------------------------------------

Subscribe to this blog is not requested, but if you want to join I will be happy and honored!
Monday January the 6 in occasion of the Epiphany there will be the draw, and the winner's name will be published on the blog.
And now the most important stuff ... THE GIFT! 
Up for grabs in this giveaway there will be this angel in blue from TILDA'S last book VINTERGLEDER ! 
I hope to see many participants, and I wish to all good luck! 


tilda,giveaway

tilda,giveaway

19 novembre 2013

!!!100 Followers!!!!!


Gente è successo!!!! Nastri & Rocchetti Country ha raggiunto i 100 followers!!!!!
Sono davvero felicissima! E' un traguardo davvero bello per un blogger!Grazie! Oggi quando ho controllato la pagina ero quasi incredula! 100 followers oddio!!!!
Non che 99 fossero meno importanti...anzi forse l'emozione più grande ce l'hai quando si iscrive il primo follower....quell'1 che da fiducia a te e al tuo neonato blog disperso nell'immensa rete web!
Poi passano i mesi e piano piano gli altri si accorgono di te e del tuo lavoro e così decidono di seguirti nella tua avventura! E ora siete diventati cento! Mi sembra davvero incredibile che a ben cento persone interessi quello che faccio! E' fantastico!
GRAZIE!!!! GRAZIE!!!!GRAZIE!!!!
Ora arriviamo al sodo.....vorrei festeggiare con voi questo avvenimento quindi state in campana perchè a giorni farò il mio primo giveaway e sarei davvero felice che tutti voi partecipaste...quindi a presto!
Un abbraccio grande!
Vale_
-----------------------------
It happened!! Nastri & Rocchetti Country has reached 100 followers!!
I'm really happy! It 's a really nice goal for a blogger! Thanks! Today when I checked my page, I was almost unbeliever! 100 followers omg!!
Not that 99 were less important ... perhaps I've got the greatest emotion when the first follower sign up to my blog.... the one that give credit to you and to your baby blog lost in the immense inernet!
Then months pass and slowly the other people notice about you and your work, and so they decide to follow you on your adventure! And now you have become hundred! It seems incredible that a hundred people are interested in what I do! It's great!
THANK YOU SO SO SO SO MUCH!!!!
So we get to the point ..... I would like to celebrate this event with you , so stay tuned because in a few days I will do my first giveaway, and I would be really happy that you all were attending ... see you soon!
A big hug!
Vale_

11 novembre 2013

Mohair Vintage Style Doll

Buon inizio settimana a tutti, come avevo anticipato nel post precedente oggi vi mostro il regalo di compleanno che ho realizzato! E' stata una vera e propria sfida alle mie capacità...ho fatto un pupazzetto a forma di pulcino con stoffa mohair utilizzando la stessa tecnica che si usa per i teddy bear!
 --------------------
Good monday to all, as I anticipated in my previous post, today I show you the birthday gift that I made! It has been a real challenge to my abilities ... I made a doll chick-shaped with mohair fabric using the same technique that is used for teddy bear!


Era da diverso tempo che volevo farne una, infatti avevo già acquistato alcuni pezzi di mohair su internet, pezzi che conservo con la massima cura visto il costo proibitivo di questa stoffa che varia dai 50 ai 120 euro al metro!!!
--------------------------
It was long time that I wanted to make one of this dolls! In fact few months ago I had bought few pieces of mohair on some internet shops, pieces that I keep with utmost care since the cost of this fabric varies from 50 to 120 euro per meter!


Il modello del pulcino l'ho acquistato su Etsy dal negozio "jennylovesbenny" e quando ho letto le istruzioni ho avuto la bella sorpresa di scoprire che questo tipo di giocattolo va interamente cucito a mano....così mi sono messa sotto e dopo un giorno e mezzo di lavoro la maggior parte era fatta! 
---------------------
I purchased the model of the chick on Etsy from the shop "jennylovesbenny" and when I read the instructions I had the nice surprise that this type of toy is sewn entirely by hand .... so I started to sew and after a day and a half of work most of it was done!


La stoffa di mohair è grossissima e parecchio rigida quindi va riempita bene altrimenti prende delle forme strane...inoltre bisogna usare un filo parecchio grosso perchè altrimenti rischi che ti si strappi in qualsiasi momento.
Una volta cucito il modello il passaggio successivo è stato mettere gli snodi in legno per braccia gambe e testa...e vi posso assicurare che non è stato per niente divertente...però devo dire che per essere la prima cosa in assoluto che realizzo con questa tecnica sono anche contenta!
-----------------
The mohair fabric is very thick and quite stiff so it's better to fill well with padding otherwise it takes strange forms ... you also have to use a thick wire to sew because you risk it tearing at any time.
Once the model has sewed the next step was to put the joints for arms, legs and head ... I can assure to you that it was not funny at all ... but I have to say that, to be the first thing I ever realized with this technique, I'm proud of the result!


Una volta finito il pulcino è abbastanza pesante per essere una bambola così piccola ma all'interno si possono aggiungere anche alcune manciate di pallini di piombo per renederla ancora più pesante.
Penso proprio che farò altri giocattoli in mohair , hanno un fascino molto vittoriano e decadente....li adoro!
 --------------------
Once finished the chick is quite heavy to be a doll so small, but if you want to make it more heavier you can also add few handfuls of steel shot inside.
I really think that I will make other toys made with mohair, they have a very Victorian and decadent charm .... I love them!


Spero che sia piaciuto anche a voi!
Un abbraccio! 
Al prossimo post con alcune nuove creazioni Tilda!
Vale!
------------------
I hope you enjoyed it too!
A hug!
In the next post I'll show you some new Tilda dolls!
Vale_


7 novembre 2013

Bunny Cake Topper...

Oggi vi mostro qualcosa che per un attimo mi ha distratta dalla produzione natalizia!
Qualche settimana fa una cara amica mi ha chiamata chiedendomi se potevo realizzare un cake topper da mettere sulla torta di compleanno di sua figlia che ieri ha computo 12 anni...il personaggio doveva essere un coniglietto di Tilda.
Così mi sono messa all'opera...ho preso il pattern l'ho rimpicciolito per adattarlo alle dimensioni di una torta...e ho cominciato ad aggiungere particolari per renderlo davvero unico....
--------------------------
Today I show you something that for a moment took me out from the Christmas works!
A few weeks ago a very good friend of mine called me and asked if I could make a cake topper to put on the birthday cake of her daughter, who yesterday had his birthday ... the character had to be a Tilda's bunny.
So I started to work ... I took the pattern and I've made it to fit the size of a cake ... and I started to add details to make it really unique ....

Cake topper

A questo punto ho preso il coperchio di una scatola l'ho ricoperto con il feltro cucendo il bordo a punto festone...il coniglietto è stato un pò rivisitato e ovviamente è vestito con un party hat e una gorgiera di tulle rosa....il fiocchetto è chiuso con un decoden a forma di cioccolatino a cuore...
---------------
At this point I took the lid of a box and I covered it with felt, sewn the edge with a  buttonhole stitch ... I had change a little bit the original pattern. Obviously the bunny wear a party hat and a ruff of pink tulle ... . the bow  is closed with a Decoden shaped like a chocolate hearth ...


Per completare l'opera ho realizzato un mini ghiacciolo sempre di Tilda e ho tempestato il tutto di glitter irridescenti per rendere tutto più scintillante!
Poi ho tirato fuori il mio libro giapponese sui dolci di feltro...e ho realizzato qualche macrons e alcune caramelline per decorare la base e dare un tocco di colore...
 -------------------
To complete the work I made a mini icicle also took from Tilda's book and I studded all of iridescent glitter to make it more sparkly!
Then I took my book of Japanese felt sweets  ... and I made ​​some macrons and some candies to decorate the base and give a touch of color ...
 
Cake topper
 
Ho disegnato un uno e un due su della gomma crepla glitterata e adesiva... li ho ritagliati e con un puntino di colla a caldo li ho incollati sui macrons...ma non ero ancora soddisfatta...
-------------------
Then I drew a one and a two on a paper of glittered and adhesive crepla rubber ...  I've cut them and with a dot of hot glue i've glued them on the macrons ... but I was not satisfied ...

Cake topper

....così ho preso della carta da scrap di Tilda, del cartoncino bianco e un pò di bakers twine e ho creato un bunting con la scritta "Happy Birthday!"...ora era tutto come lo avevo immaginato nella mia testa.
 E' stato un progetto impegnativo, anche perchè prima di allora non avevo mai realizzato nulla di simile e i tempi erano relativamente stretti...però la soddisfazione è stata davvero tanta!
Ho realizzato anche il regalo di compleanno...ma quello ve lo mostro nel prossimo post!
Un abbraccio!
Vale_
-----------------

so .... I took some scrapbooking paper, a white cardboard and a piece of bakers twine and I created a  "Happy Birthday!" bunting ... now it was exactly as I had imagined it in my head.
It was a challenging project, partly because before I had never made ​​anything like this and  partly because the times were relatively few ... but the satisfaction was really great!
I also made the birthday gift ... but I'll show it to you in the next post!
A hug!
Vale_

2 novembre 2013

Christmas Reindeer

Buongiorno a tutti! Anche Halloween è passato...e il Natale sembra sempre più vicino, oggi vi presento una creazione che mi ha impegnato parecchio per essere completata, sono molto contenta di mostrarvela! L'idea mi è venuta osservando una decorazione per l'albero vista in un negozio di articoli casalinghi...una piccola alce che guida un aeroplanino in ferro, così mi sono detta perchè non realizzare qualcosa di simile...ma in stoffa per decorare la casa a Natale?
--------------------------------
Hello everyone! Although Halloween has gone ... and Christmas seems closer and closer. Today I would like to present you a creation that took me a long time to be realized. I am very happy to show it to you! The idea came to me looking a christmas tree decoration view in a store ... a little moose seat in a small iron airplane, so I said to me... why not make something like this? ... but in fabric, made for decorate the house for Christmas!


Naturalmente ho creato anche una compagna per questa renna aviatore...lei tiene il sacco della posta aerea pieno di letterine per Babbo Natale!
---------------------
Of course I also created a girlfriend for this reindeer aviator ... she holds in hands the bag, full of airmail letters for Santa Claus!


La parte del progetto di cui sono più orgogliosa è senz'altro l'aeroplanino!
Volevo creare un oggetto completamente realizzato in stoffa ma che non fosse il solito pezzo di tessuto cucito girato e imbottito! Questo aeroplanino si può sfilare dal corpo della renna e si può anche appoggiare ad una mensola mettendogli la renna seduta accanto!
-------------------------
The part of the project that make me most proud is certainly the fabric airplane!
I wanted to create an object made ​​entirely of fabric but that was not the usual piece of fabric sewn and stuffed! This airplane can be pulled out from the body of the reindeer and you can also put it on a shelf with the reindeer sitting near!


 I pattern per realizzare questi personaggi sono finalmente nel negozio Etsy!
------------------
The patterns to make these characters are ready! You could find them in my  Etsy shop!


Spero che questi personaggi vi siano piaciuti!
Vi auguro un buon weekend!
Un abbraccio! A presto!
Vale_
-----------------------

I hope you like these characters!
I wish you a lovely weekend!
A hug! See you soon!
Vale_

27 ottobre 2013

Tilda Vintergleder Polar Bear!

Ciao a tutte, un'altra settimana è passata e i lavori continuano...il tempo però mi sembra sempre pochissimo!
Immagino che anche voi siate tutte prese con i preparativi per il Natale!
Oggi vi presento una creazione dall'ultimissimo libro di Tilda Vintergleder...gli orsi polari!
Questo modello è davvero fantastico e la pelliccia è semplicemente fantastica...bianca e morbidissima!
Creare questi orsi è stato davvero divertente!
Spero vi piacciano!
----------------------------------------

Hi, another week is gone and the work continues ... but the time seems not enough to do everything!
I suppose that all of you are doing all the craft works for Christmas!
Today i show you a creation from the latest book of Tilda Vintergleder ... the polar bears!
This model is really fantastic and the fur is white and soft ... just fantastic!
Create these bears was really fun!
I hope you like them!


Ho realizzato tutte e tre le misure ma quello più piccolo ha trovato casa prima che riuscissi a fotografarlo!
 -----------------------------------------

I made all three measures, but the smaller one has found a home before I could photograph it!
 

Questo è quello misura extra large!
-------------------
This is the bigger one!


Questo è quello medio!
------------------
This is the medium


In cantiere ci sono anche alcune pattinatrici con la pelliccia...ma sto aspettando la stoffa per fare le gambe! Speriamo arrivi presto!

Gli Orsi sono in vendita nel mio negozio etsy!
Ne approfitto per comunicarvi che nel negozio sono disponibili anche i pattern per realizzare i tre alberini di feltro del post pubblicato l'anno scorso QUI!
------------------------------

In the works in progress there are also some Tilda skaters with the fur ... but I'm waiting for the fabric to make the legs! Hopefully it come soon!
The Bears are on sale in my etsy shop!
I just want to to inform you that in the store are also available the patterns to made the three felt trees of the post I've published last year HERE!

18 ottobre 2013

Snowmen....Pupazzi di neve!

I preparativi per il Natale non si fanno mai troppo in anticipo...soprattutto quando si tratta di cucire imbottire etc etc...perchè tutto sia pronto e perfetto per il periodo natalizio vero e proprio.
Ecco allora nuovi personaggi che potrete creare per decorare la vostra casa o regalare a qualcuno di speciale!
Oggi vi voglio presentare tre piccoli pupazzi di neve !

The preparations for Christmas are never too early ... especially when you have to sew stuffing etc etc ... so that everything is ready and perfect for Christmas time.
Here then new characters that you can create to decorate your home or give to someone special!
Today I want to present three small snowmen!


Si possono realizzare usando qualsiasi materiale abbiate in casa recuperando ritagli e stoffe!

You could use any material you have at home trimmings and fabrics!


Eccoli più nel dettaglio! 


Un pupazzo slanciato dall'aria distinta
A snowman slender, distinguished-looking


Un pupazzo infreddolito con un buffo paraorecchie e la sciarpa
 A shivering snowman with a funny earmuffs and scarf


E un tenero pupazzetto con un grosso fiocco e un lungo berretto che porge un pacchetto regalo.
And a sweet snowman with a big bow and a long hat that is handing a gift 

Come al solito potete trovare i pattern per realizzarrli nel mio negozio Etsy!
Un abbraccio! Buon Week end a tutti!

As usual you could find this pattern on my Etsy shop!
A hug! Have a lovely weekend!

Vale_
Related Posts Plugin for WordPress, Blogger...